
How to Guide
Initial Setup Details
 Initial email
Once your organisation admin has entered your details into the system you will be sent an email with a link to follow to set up your password for the EverydayComply system (password links will only ever be sent from support@everydaycomply.com) Follow the link in the email and enter the password you wish to use for the system into the boxes provided
How to enter the system
To enter the system point your browser to the URL: http://www.everydaycomply.com
You will be provided with two panels, the panel on the right has a link to the EverydayLimited website where you can find out more details about the system and how to purchase the EverydayComply software if you have not yet done so. The panel on the left will allow you enter your Organisation ID and gain access to the system

You will be provided with a box to enter your unique organisation ID. This will be provided by your organization admin. Once you have entered your organisation ID and clicked “Enter Org ID” you will be taken to a second page and again see two panels
On this second page, the panel on the right can be used to go back to the previous screen if you have entered your organisation ID incorrectly, you can do this by clicking the “click here,” link. The panel on the right should also show your organisations logo, if you cannot see you organisations logo or see a different organisations logo you may have entered your “organisation ID” incorrectly
The panel on the left will enable you to enter your login details; enter your email address and password into the boxes provided to enter the system
Menu Options
Click on the menu option to be taken to the relevent part of the guide

Dashboard
The main menu of the software, use the dashboard to access the full range of features within the EverydayComply software that are available to you
Assessments
Create assessments from any question banks you have created or have access to and assign these assessments to anyone throughout your organisation
 My Organisation
Edit details of your organisation name, image etc – Add and remove users to your organisation – View which Question Banks your organisation is subscribed to – Create and manage groups, add users to these groups and select group leaders
My Assessments
View and take assessments that you have been assigned – See detailed results of previous assessments you have taken – down to an individual question
My Results
See detailed results for all historical assessments you have taken – Both in tabular and graph form – Graphs comparing average results per Question bank, average results per assessments and your complete personal results over time
 Question Banks
View, create and edit question banks that have been assigned or created by your organisation
 Results
See detailed results for all historical assessments your entire organisation have taken – Both in tabular and graph form – Graphs comparing average results per Question bank, average results per assessments and complete historical results over time for your entire organisation – down to an individual user
Question Types
Details on the different types of questions that can be used within the system
 Assessments
Create assessments from any question banks you have created or have access to and assign these assessments to anyone throughout your organisation
 Create Assessment
From the Dashboard, select Assessments – Next click “create” from the menu on the assessments page – Next follow the simple 4 step process to set up your assessment:
Step 1
On step 1 you are given a list of question banks (either that your organisation has created or that you have been assigned by the EverydayComply admins) select from the list of question banks to begin creating your assessment – Simple click on the image of the desired question bank and a green tick will appear
Step 2
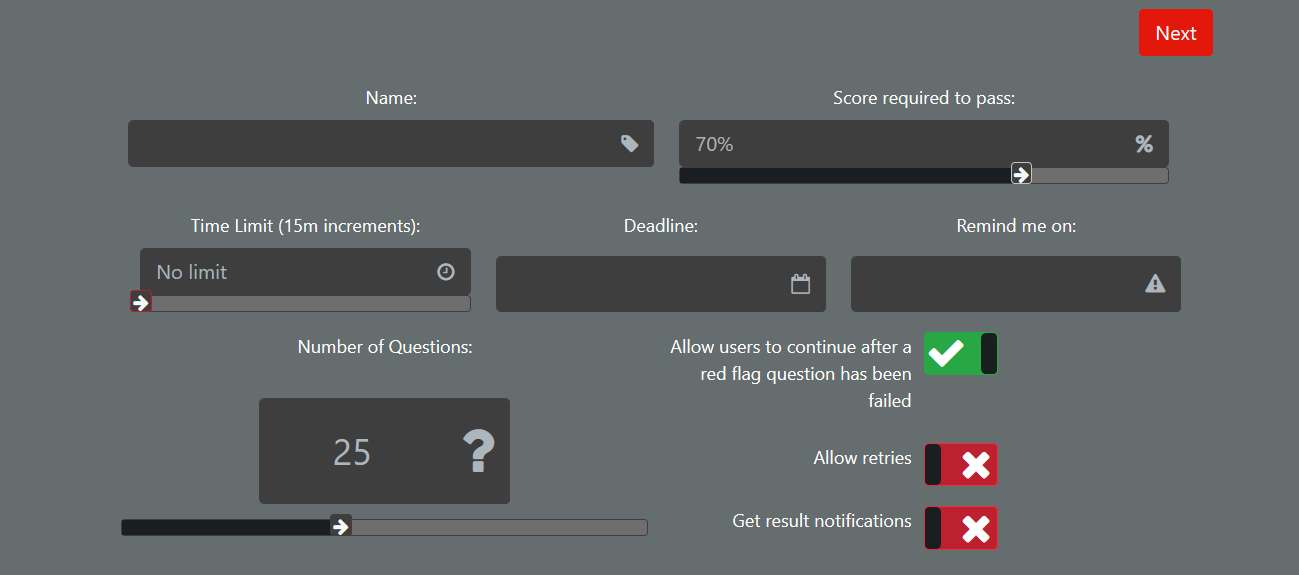
Details – select from the options provided to begin shaping your assessment. These options include:
Score required to pass
The percentage of questions someone will have to answer correctly to achieve a “pass” mark on the assessment
Time limit
Once started the user has a set amount of time to complete the assessment – The clock will pause in the case of an internet outage etc – The time limit will apply while the assessment is active
Deadline
Use the calendar function to set a date that the assessment must be completed by – This can be especially useful if new legislation is coming into practice on a specific date
Remind me on
use the calendar function to set a reminder that will be sent on the specified date to anyone that the assessment has been assigned to
Number of questions
This sets the number of questions in your assessment – As default a Question bank can contain up to 60 questions – Whatever you set “number of questions” to will take a random selection of questions from the selected question bank (you can specify specific questions in the next step)
 Allow users to continue after a red flag question has been failed
Select this to allow users to continue if you have set red flag questions (red flag questions will be explained in step 3)
 Allow retries
This will allow a user to retake an assessment as many times as they want until they achieve a pass mark – Passed assessments are not repeatable
Get result notifications
This will give the Org admin a notification everytime an assessment is completed (passed or failed)
Step 3
Flags and Restrictions – In step 3 you are shown a cut down view of every question within your selected question bank allowing you to set specific rules for each individual question
Yellow Flag
When you select a question as a “Yellow Flag” question the Organisation admin will be given a notification whenever a yellow flag question is failed – “Yellow Flag” questions are also marked in a users results – These are for important questions that you feel it is worth keeping a closer eye on your users answers
Red Flag
These are important question that are vital to a users understanding of the subject matter – If you have selected the “red flag” option in step 2 then once a user answers a red flag question incorrectly their assessment will immediately end and they will be given a “fail” grade – If this option is not selected and a user answers a “red flag” question they will be allowed to compete the rest of the assessment but will still be given a fail grade – “Red Flag” questions are also marked in a users results
Restrictions
There are two options for restrictions – “Compulsory” – When the assessment is selecting from a random sample of questions any questions marked will “compulsory” will always be included in the assessment – Similarly, “Excluded” – Questions marked as “excluded” will not appear in the assessment – This option can be useful if you do not want to remove a question from a question bank but do not wish to run it for this specific assessment
Step 4
Assign to users – This step allows you to assign the assessment to all or to a select group of users within your organisation ( An assessment can be assigned to other users or re-assigned to users from the Assessment page at a later date if required) – Assigning an assessment to a group leader at this stage will allow them to assign the assessment to the rest of their group – More information on groups can be found in the groups section
Assign an Assessment
The default assessment screen shows you detailed information on all the assessments your organisation has created including: Name, Number of questions, Number of excluded and compulsory questions, Number of flagged questions, Number of users completed the assessment and number of users failed the assessment
Assign an Assessment
By clicking “assign” next to an assessment you are able to assign that assessment to any users registered to your organisation – Once an assessment has been created a group leader is also able to assign their assessment to their group
Other Assessment Options
 Grid View
A different view of your assessments providing a more detailed view
 Quick Start Assessment Creation
This allows you to set up an assessment using a predefined set of details – These details will be set by an EverydayComply admin and will be available to any organisation that has access to the specific question bank
My Organisation
Edit details of your organisation name, image etc – Add and remove users to your organisation – View what Question banks your organisation is subscribed to – Create and manage groups, add users to these groups and select group leaders

 My Organisation – Details
Edit or Amend your organisations details – Including: Name, Logo, Tagline and Description – Simple fill in the relevant information and click “update” to change these details
 My Organisation – Users
Table & Grid View
Show detailed information on the users within your organisation – Including: Name, Email & Role within the organisation
 Delete user
Delete users from your organisation (this is non reversible)
 Flagged User
This tick box allows you to track a user, By selecting this option you (the organisation admin) will be given notifications each time the flagged user passes or fails an assessment
 Group View Permissions
Allows an Organisation admin to set permissions for group leaders in regards to what groups / results they are able to see
 Results
This will take you to the results section for a specific user – More details around this can be found in the Results section below
My Organisation – Users – Create

This is where you can add individual users to your organisation – Fill in the name and email address of the new user and select if you want the user to be an “Organisation admin” and an email will be sent to them from the EverydayComply software with a link to enter their password and create their account – Emails from the EverydayComply system will only ever be sent from support@everydaycomply.com
 My Organisation – Users – Upload
Clicking on “Upload” will give you the option to download a simple Excel spreadsheet template to upload multiple users at once
My Organization – Users – Groups

Set up new groups – add users to these groups and select group users – Groups allow you to group and monitor a specific selection of users within your organisation – You may wish to group your users by department or country for example – The group section also allows you to select a group leader for each group – Group leaders are given the ability to assign assessments to their group members and view / compare all results from their group members
More Details on Groups
“New Group” – Allows you to create and name a new group to begin adding users to – use “Edit Users” to initially add a user / or any number of users to you group – Once you have added a user to your group you are then able to use the “Choose Group Leader” option to select your group leader and grant them the relevant permissions – Once a user has been promoted to a group leader they are then able to add users to their group and see relevant results for any user within that group – Each group can only have a single group leader who is responsible for that group – Users can be added to multiple groups where appropriate
Group View Permissions
Group view permissions allow you to give a user access to view and compare a groups results without making them a group leader – Each group can have multiple group viewers – To set group view permissions navigate to Dashboard / My Organisation / Users – Find the user in the table that you wish to give group view permissions to and click on “group view permissions” – In the window that pops up select which group you wish to give the user permission to view
 My Assessments
View and take assessments that you have been assigned – See detailed results of previous assessments you have taken – down to an individual question
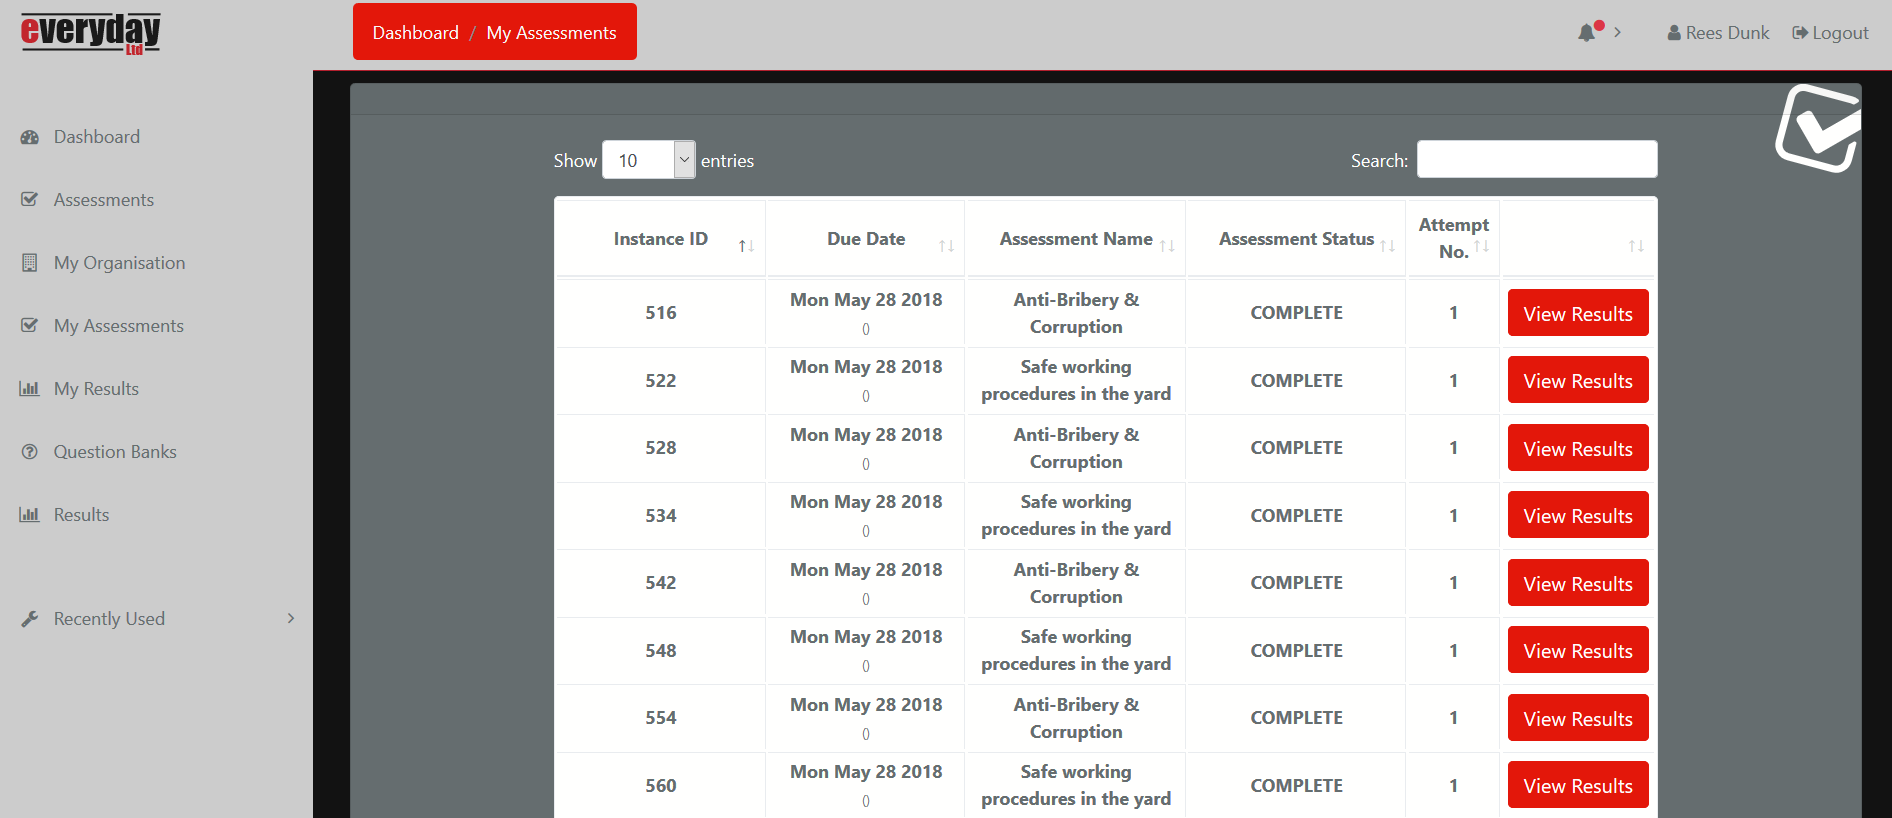
My Assessments
See a tabular view of Assessments that have been assigned to you individually – Information, including: Instance ID, Due Date(if set), Assessment name, Assessment Status, No of Attempts and Results – The “search” function allows you to search for a specific assessment or group of assessments – You can also use the arrows at the top of each column to sort the assessments in a range of ways
 My Assessments – View Results
clicking on “view results” will show you your percentage score for that specific assessment – This will also give you the option “review results” to see detailed results for this specific assessment, showing results for each question including what you answered against the correct answer / answers
 My Results
See detailed results for all historical assessments you have taken – Both in tabular and graph form – Graphs comparing average results per Question bank, average results per assessments and your complete personal results over time
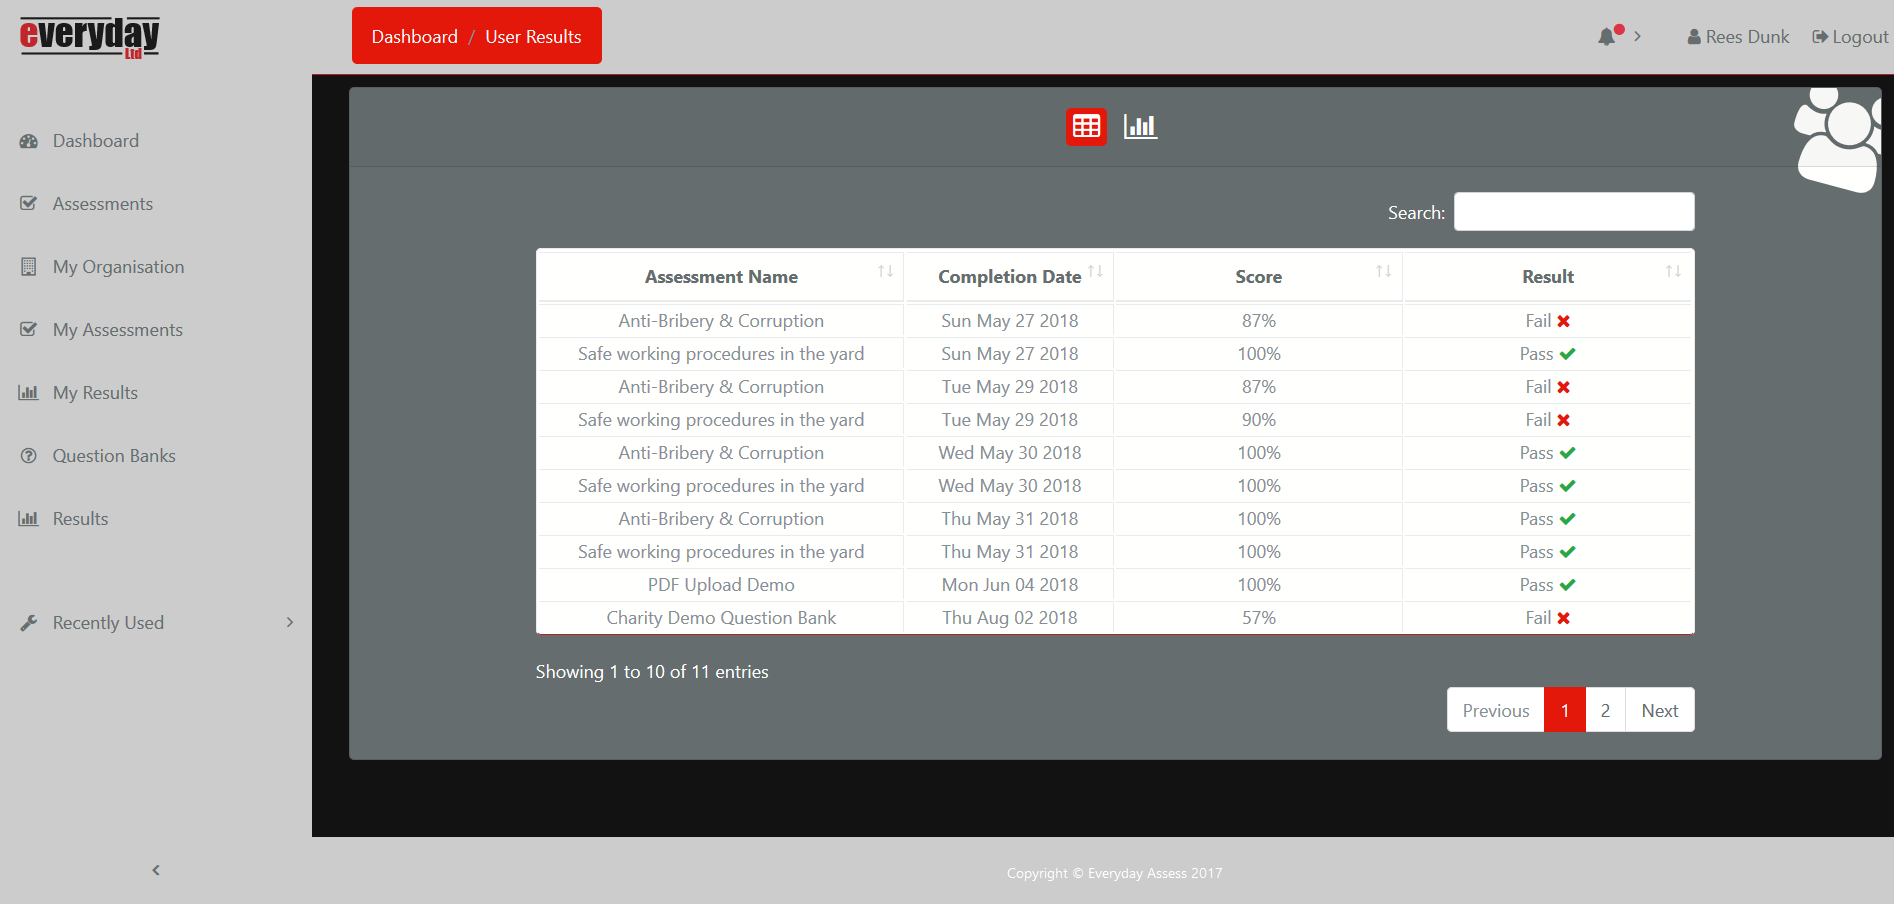
My Results
Detailed tabular view of all the assessments you as an individual have undertaken – Including: Assessment name, Completion date, Score (percentage), and Result (pass or fail) – The “search” function allows you to search for a specific assessment or group of assessments – You can also use the arrows at the top of each column to sort the assessments in a range of ways
 My Results – Graphs
See detailed results for all historical assessments you have taken in graph form – Compare average results per assessment, average results per questions bank, and your results as a whole across the entire system. These graphs allow you to easily monitor your increased understanding of the subject matter and pinpoint and address any gaps in knowledge you may still have as an individual
Question Banks
View, create and edit question banks that have been assigned or created by your organisation
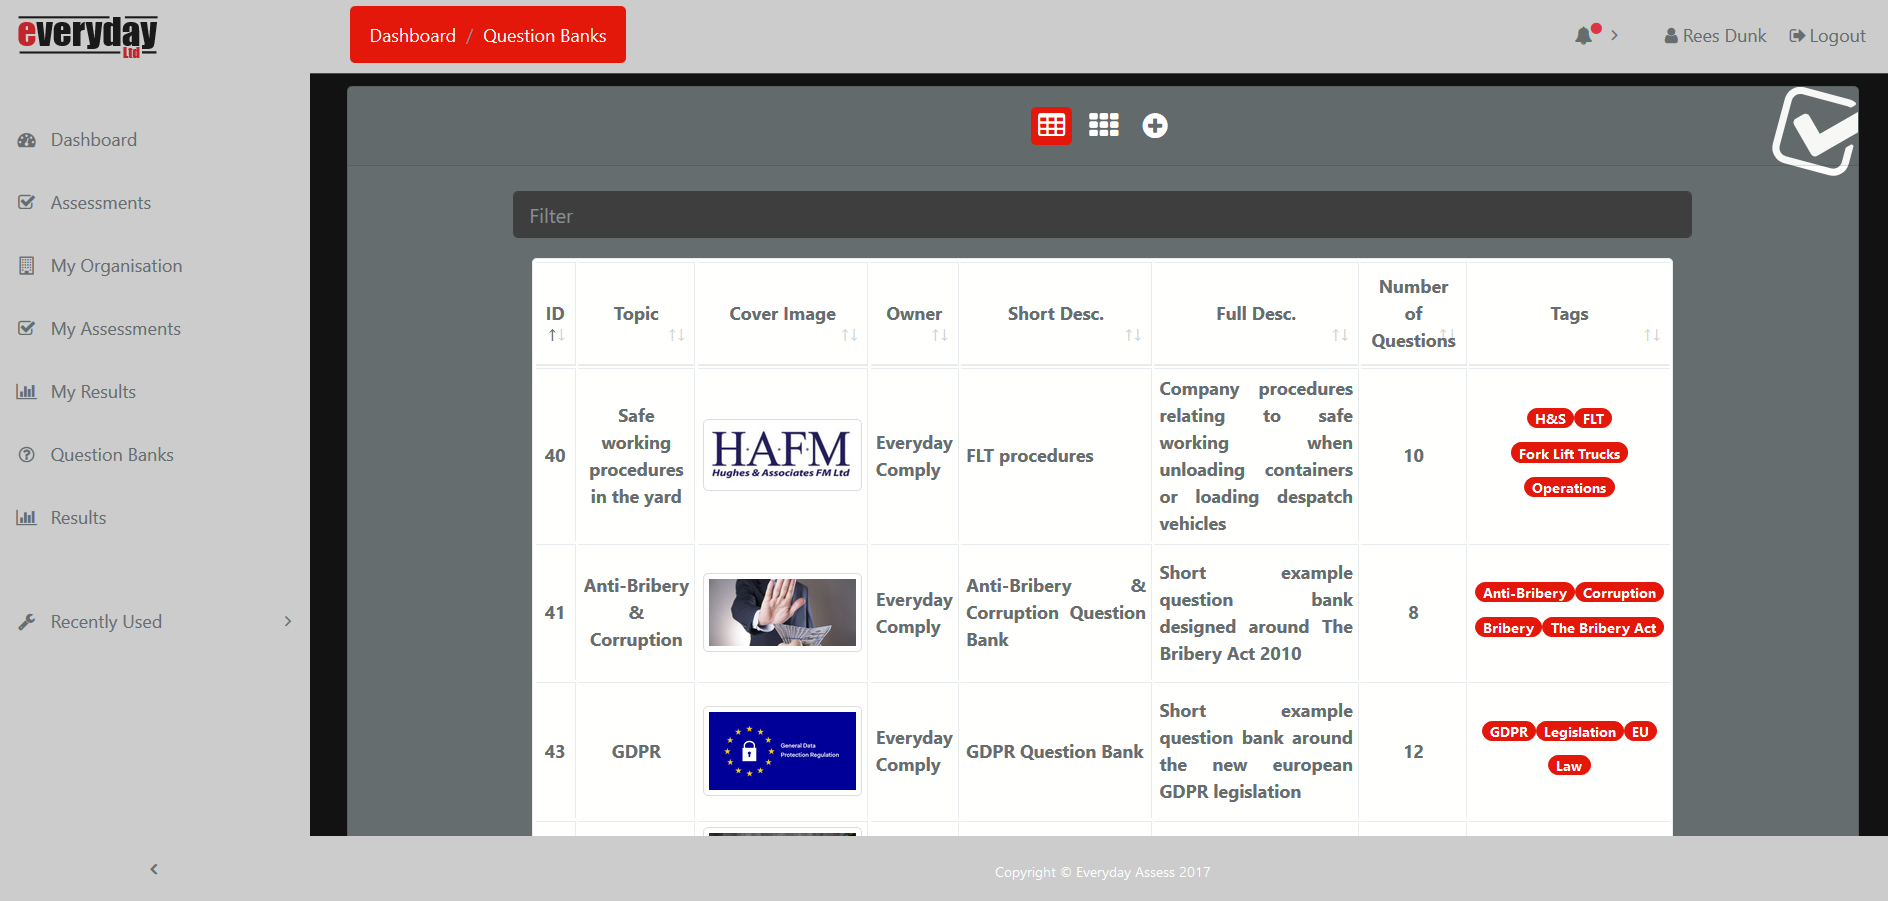
Question Banks – Table View / Grid View
See detailed information on all Question banks that your organisation has access to – The EverydayComply system allows for you to both be assigned and to create your own question banks to form your assessments from – As standard organisations are allowed 5 question banks each containing up to 60 questions (obviously this number can be increased at the request of the end user) – The Question bank page shows information including: Question bank ID, Name, Cover Image, Description, Number of questions etc, All columns are sortable (by clicking the arrows at the top of the column) for ease of use. There is also a filter box at the top of the page to allow you to easily sort and search through your question banks – There are many ways EverydayComply can help you initially creating question banks – Simple contact you account director to find out some of the services we can offer
Question Banks – Create
This is where you as an organisation can create your own Question banks (keep in mind that these self created question banks will be included in your organisations overall question bank allowance) – On this initial page you will create the basic settings for your new question bank, these include: an image for your question bank, a topic, a short description, a description and any tags(tags are one word or short descriptions of your question banks content that you can use to search or identify your question banks at a later time) for your question bank – Once you have filled in all the relevant information, click “create question bank” and the base of our new question bank will be created (at this stage the question bank should now appear in your lists of question banks)
Question Banks – “Your Question Bank” – Details
This first page is very similar to the previous page when you set up the basic settings of your question bank – On this page you are able to edit the details that you have previously set up for your question bank (at this stage you are however no longer able to edit the title of your question bank as it is now set within the database) – Notice that the status of your question bank at this stage is currently unpublished
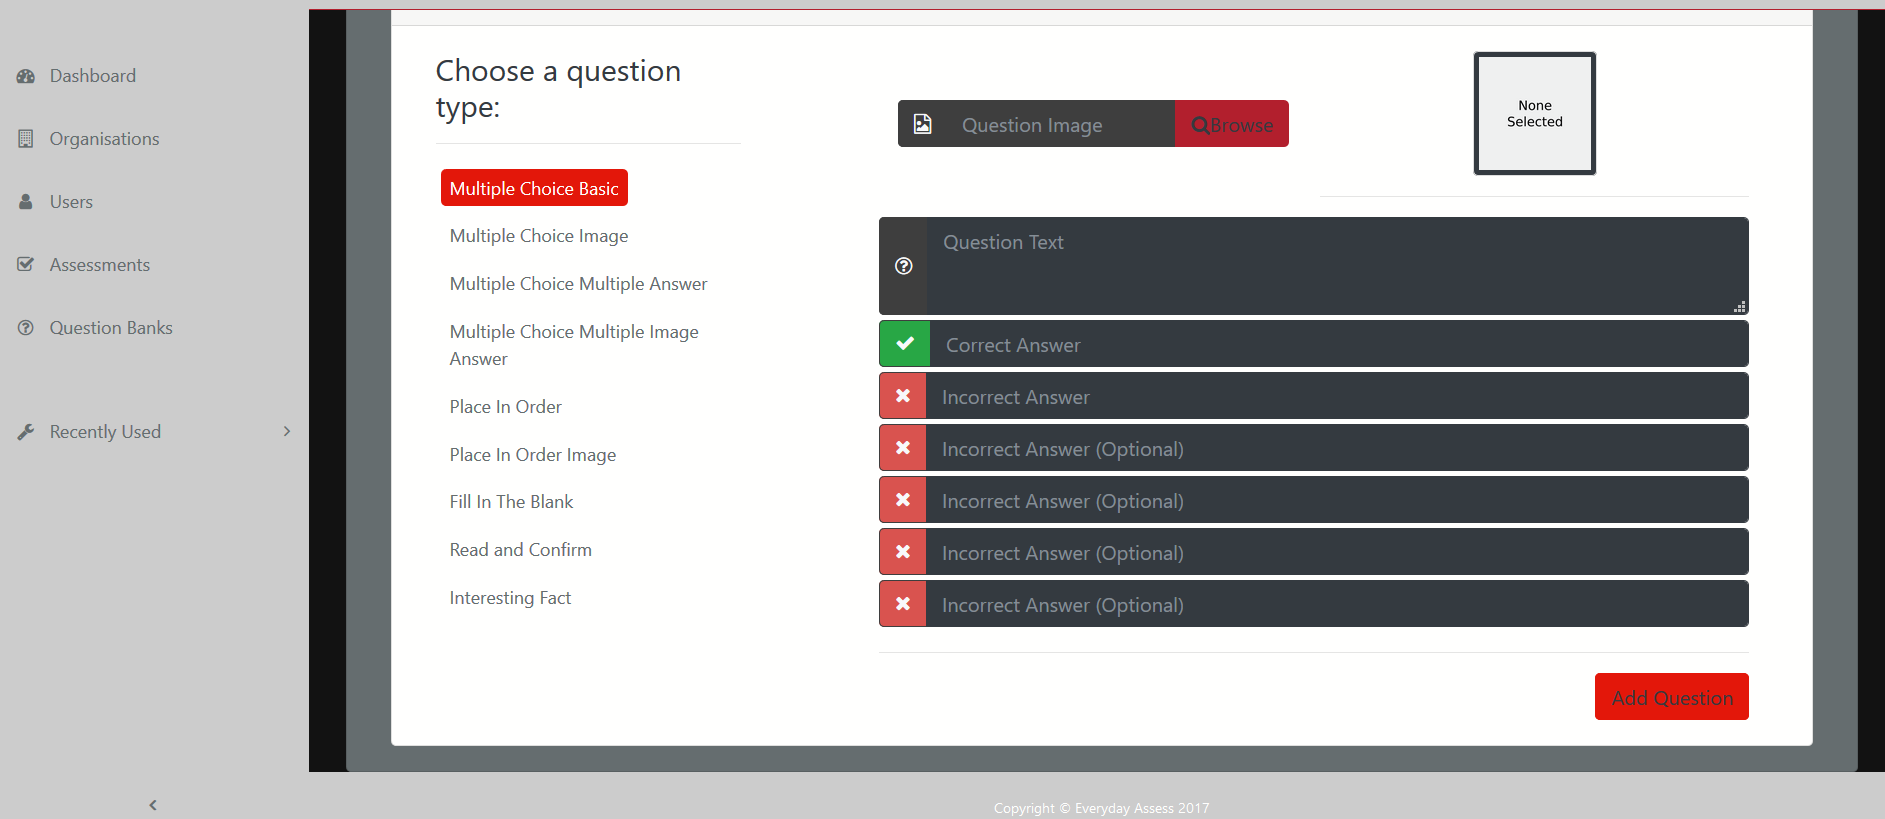
Question Banks – “Your Question Bank” – Questions – Create
This is where you are able to add questions to your question bank – First select the type of question you wish to add from the list on the left of the page – Once you have selected you question type you can upload an image (each individual question can have its own unique image) to your question – Now simple fill in the relevant boxes – The Question into the question type box at the top of the page and the answer / answers into the answer boxes (you can change the answer boxes to reflect wrong or right answers by selecting the green tick or the red cross) – Once you are happy with your question you can select “Add Question” to complete the process and add your question to the question bank – For more information on the different question types available to you see the “Question Types” section
Question Banks – “Your Question Bank” – Questions – Upload
If you would like to upload a large range of question in to the system at once Everyday Comply can supply you with a form and the ability to do this – Please contact your account director at EverydayComply
 Question Banks – “Your Question Bank” – Questions – Tableview
Here you can see a tabular view of all question and answers within the question bank – You can click on each question to expand and see further details – This allows you to review and check your questions are exactly how you want them before you publish your question bank
Question Banks – “Your Question Bank” – Questions – Gridview
Here you can see a grid view of all question and answers within the question bank – In the Grid View the questions within the question bank are divided by question type – select the question type on the left of the page to see all questions within the question bank for that specific question type
Question Banks – “Your Question Bank” – Questions – Guide
Here you can see a brief guide on all the different question types within the system – For a slightly more in depth guide on the different question types see the “Question Types” section below
Question Banks – “Your Question Bank” – Delete
This can be used to delete a question bank and all associated material (only unpublished question banks are able to be deleted) – If you have published a Question bank and for whatever reason need to delete please contact your EverydayComply account manager, however all historical results against this question bank will also be deleted – This is non-reversible
Question Banks – “Your Question Bank” – Publish
This will publish your question bank – Once a question bank has been published you are no longer able to delete the question bank as a whole or any questions within that question bank – After a question bank has been published you are unable to edit any part of that question bank without making a new version of that question bank (for more information on this see the “Question Banks – Version” section)
 Question Banks – “Your Question Bank” – Version
Once you have published a question bank you are only able to make changes to that question bank through creating a new version of that question bank – The results for each new version of a question bank are comparable against all new historical versions of that question bank
Question Banks – “Your Question Bank” – Details – Version
Clicking on new version will take you back to the details page of your question bank – however you will notice that your question bank is now again unpublished – You will also notice that the title of your question bank has changed in the path above – Dashboard / Question Banks / “Your Question Bank” is now Dashboard / Question Banks / “Your Question Bank V2” – You will also notice this version number shown elsewhere on the system – We recommend when creating assessments you manually set the version number in the title of the assessment (as this will not be done manually) to avoid confusion
Question Banks – “Your Question Bank” – Details – Version
You are now able to add and delete questions and make other minor questions to your question bank – Once you have completed your changes you are then able to re-publish your question bank and again use it to form assessments – You are able to compare the results across all historical versions of your question banks
Question Banks – “Your Question Bank” – Details – Version – History
When creating a new version of a question bank you will also notice you are given a “history” option this option will allow you to roll-back to a previous version of your question bank at any time – If you click on the “rollback” option you will be shown a table with all available versions of your question bank simple select the version of the question bank you wish to use
Question Types
As well as setting an image against each question bank you can add a unique image to each question when adding it to the system
Multiple Choice Basic
These are basic questions that have one correct answer and up to 5 incorrect answers – Fill in the question box with your question text, add the correct answer in the first of the answer boxes and up to five incorrect answers in the subsequent answer boxes – The system will automatically randomise the correct & incorrect answers when including the question in an assessment
Multiple Choice Image
These are basic image questions that have one correct answer and up to 5 incorrect answers – Fill in the question box with your question text, add the correct image to the first of the answer boxes and upload to the system. Make sure to also add your caption text to each answer. Now add up to five incorrect image answers and captions in the subsequent answer boxes
Multiple Choice Multiple Answer
These are similar to the multiple choice basic questions however these allow you to have up to 12 answers, with any of the 12 being correct or incorrect – Fill in the question box at the top, add the correct answer / answers in to the answer boxes followed by the incorrect answer / answers. As default the system will show the top 2 answers as correct and the following as incorrect, you are able to edit this by selecting the red crosses on the end of the answer boxes to change them to green ticks and vice versa
Multiple Choice Multiple Image Answer
These are more complex multiple image questions that allow you to have six answers, any number of which are correct or incorrect answers – Fill in the question box at the top, add the correct images to the answer boxes and upload to the system. Make sure to also add your caption text to each answer. You are able to edit whether an answer is correct or incorrect by selecting the red crosses on the end of the answer boxes to change them to green ticks and vice versa
Place In Order
These are Questions where the answers must be placed in a specific order to achieve a correct answer. Use the box provided to upload an image against the question. Next fill in the question box provided with your question text. Finally add in your answers to the answer boxes provided, add your answers in the order to which you would like your question to be answered to create a correct answer
Place In Order Image
These are similar to the place in order question above however you will also upload an image against each answer for these questions – The system will then place these images in a random order – allowing the user to drag each image into its desired order
Fill in the Blank
These questions allow for a user to add in a single word or short sentence to complete a question. As in the other question types your are first able to add a question though the question box provided. Next you are able to use the Question box to add the question text provided – If the answer you wish your user to provide is in any way ambiguous we suggest within your question text you provide some example answers (this can also help with any spelling considerations)
Fact
These are not questions as there are no answers associated with the fact type. These are a free option to enter an image and some text – These can be used to break up an assessment or to give information you feel it would be helpful for a user to have during an assessment
Results
See detailed results for all historical assessments your entire organisation have taken – Both in tabular and graph form – Graphs comparing average results per Question bank, average results per assessments and complete historical results over time for your entire organisation – down to an individual user
Results – Table View
Detailed tabular view of all the assessments your entire organisation have undertaken – Including: Assessment name, Completion date, Score (percentage), and Result (pass or fail) – You will also be able to see if a user has failed on a percentage basis or has answered a red flag question incorrectly – The “search” function allows you to search for a specific assessment or group of assessments – You can also use the arrows at the top of each column to sort the assessments in a range of ways
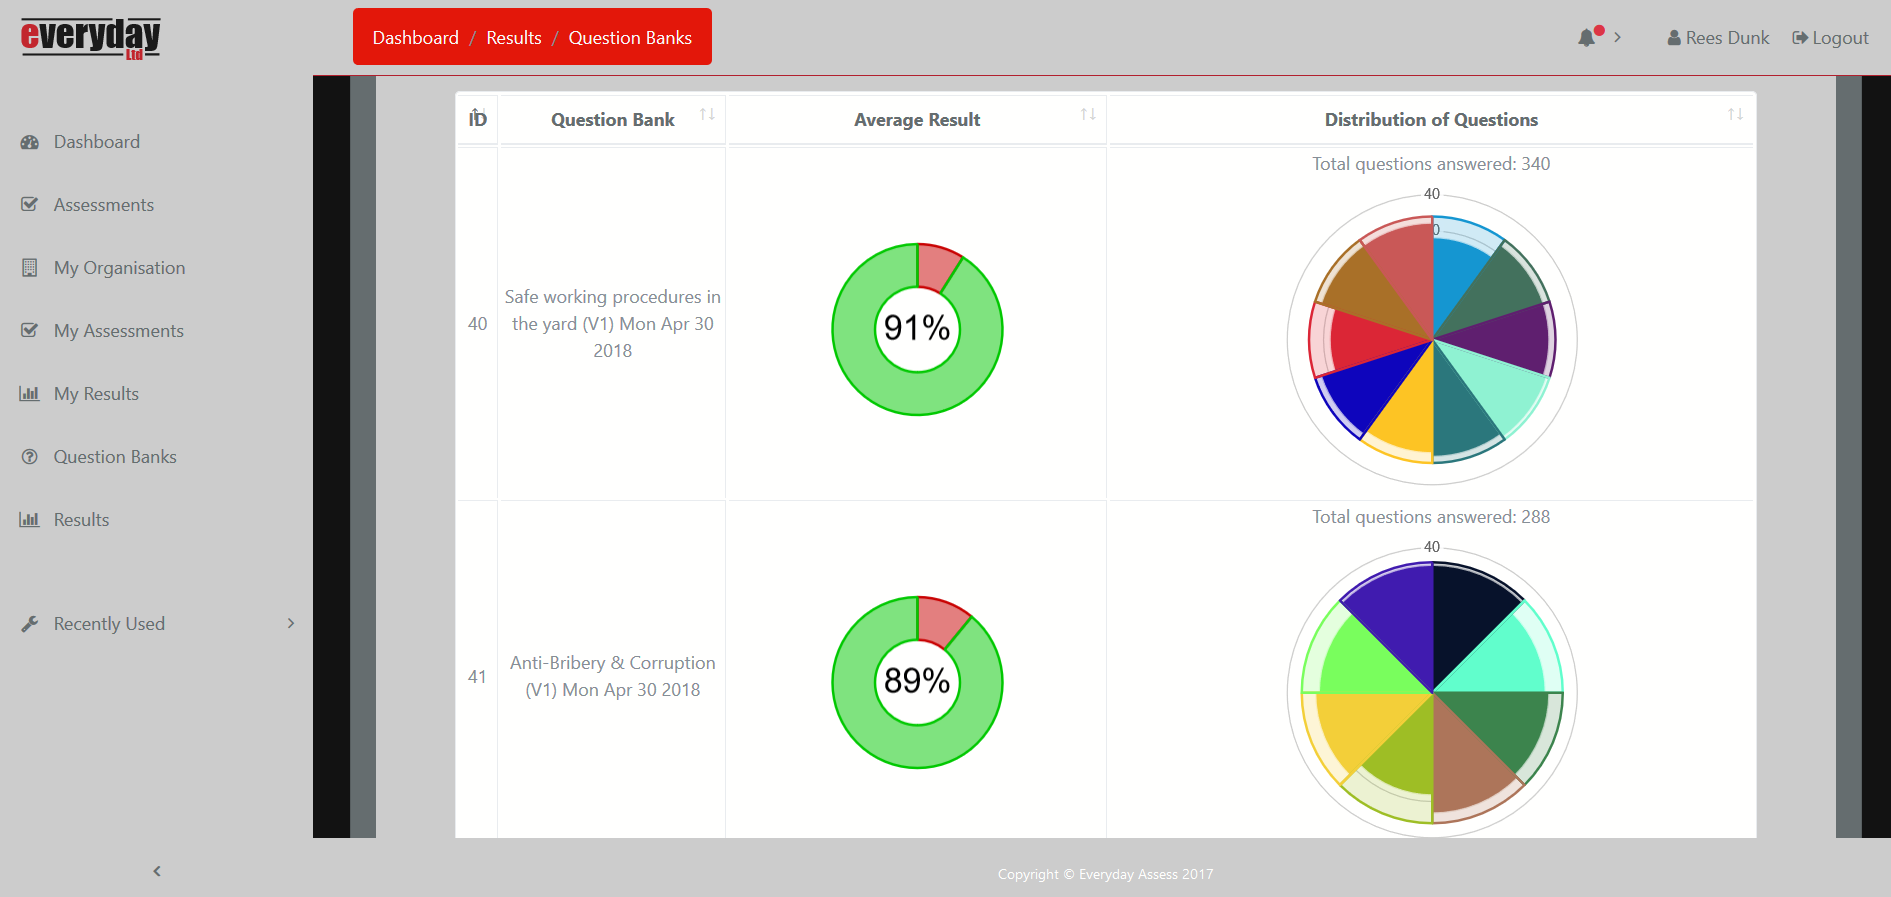
Results – Graphs
See detailed results for all historical assessments your organisation have taken in graph form – Compare average results per assessment, average results per questions bank, and your organisations results as a whole across the entire system – By clicking the “view more details” button you are able to see more information on each question bank and each individual question – These graphs allow you to easily monitor your increased understanding of the subject matter and pinpoint and address any gaps in knowledge you may still have as an organisation